Markdown Syntax
Markdown is the lightweight markup language used to author interactive content. More specifically, lab steps and challenge tasks are written in GitHub-flavored Markdown with the help of markup extensions to incorporate additional UI capabilities as described in the following sections.
UI Shortcuts
Labs use UI shortcuts to help the learner focus on the topic instead of copying long commands. These are optional, but encouraged. It is up to the author’s discretion to use shortcuts when appropriate.
Execute
Applying the execute class will make any code snippet executable within the current terminal.
This can be added to any code snippet, for example:
`top`{{execute}}
This also works with “fenced” multi-line code blocks:
```
cd example &&
  npm install
```{{execute}}
If you wish the command to be run in a specific terminal tab, include T#, where # is the tab number. For example, if you want to target the second terminal use T2:
`sh some_file.sh`{{execute T2}}
This allows certain terminal tabs to be reused for certain actions, or allows a long-running command such as development servers to run in a secondary tab.
Without a terminal number {{execute}} commands are sent to the currently selected terminal tab. To switch back to the first terminal use {{execute T1}}. If you anticipate a user jumping around to rerun previous commands, you may want to add an explicit T1 to prior code blocks as well.
Interrupt
When using execute, you can include an interrupt class to execute a Ctrl+C, stopping any task that was running previously. This can be useful if the previous commands in the terminal might capture user input, such as top.
This can be added to any code snippet like so:
`top`{{execute interrupt}}
Copy
The use of the copy class will copy whatever is inside the code element to the user’s clipboard. For example:
`top`{{copy}}
Open
Applying an open class will open the specified file in the editor. It can be used as follows:
`myfile.js`{{open}}
Note: O’Reilly style normaly dictates that filenames and filepaths should appear in italic font (e.g., src/index.js). The open command, however, requires use of a code span instead.
A path may be given to the file, but that path will be relative to the uieditorpath setting given in index.json. Only files below that path will be listed in the tree view of files for the editor. The default value for uieditorpath is /root.
Clipboard Integration
The following will copy the text docker into the clipboard. This is useful if users need to interact with a web interface.
`docker`{{copy}}
Katacoda supports copying longer code snippets into the clipboard by using a <pre> tag with class=file and data-target=clipboard.
<pre class="file" data-target="clipboard">
Copy Me To The Clipboard!!
</pre>
Note that without the class="file" attribute, it will not display the clipboard functionality. For example:
<pre data-target="clipboard">
Not a file
</pre>
won’t work as expected.
Syntax Highlighting
Katacoda has incorporated HighlightJS to automatically provide syntax highlighting on any code snippets marked with a highlight language. We support the core languagues included in the highlight.js default pakage.
While we have enabled automatic language detection, we encourage authors to explicitly set the language on all code blocks to ensure the correct highlighting is applied.
The preferred method of code highlighting is via markdown code fences. For example:
```py
from pathlib import Path

p = Path()
```
If you want to highlight <pre> blocks, use the lang="" attribute. For example:
<pre lang="c">
#include <stdio.h>

int main() {
   printf("Hello, World!");
   return 0;
}
</pre>
Example
Learn more about the extensions at https://katacoda.com/scenario-examples/scenarios/markdown-extensions
Editor Integration
| Attribute | Usage |
|---|---|
data-filename | Filename to perform action against. |
data-target | Perform action with the text against the file based on filename: - replace: Replace contents of the file - prepend: Add to the start of the file - append: Add to the end of the file - insert: replace the data-marker in file |
data-marker | For use with data-target insert. Replaces a string matching the marker (e.g. #TODO-insert) with the code snippet provided. |
Target Examples
Replace Target
<pre class="file" data-filename="app.js" data-target="replace">var http = require('http');
var requestListener = function (req, res) {
  res.writeHead(200);
  res.end('Hello, World!');
}

var server = http.createServer(requestListener);
server.listen(3000, function() { console.log("Listening on port 3000")});
</pre>
Insert Target
The existing app.js file must include the text #TODO-insert where the console.log to appear.
<pre class="file" data-filename="app.js" data-target="insert" data-marker="#TODO-insert">
    console.log("Hello World")
</pre>
Clipboard Target
<pre class="file" data-target="clipboard">TestP@ssw0rd</pre>
Displaying Images
Images within the lab’s assets directory can be embedded into the scenarios using standard markdown image markup.
For example if a logo-text-with-head.png file exists in the /assets/ directory, and you wanted to embed it in a step, you would do the following:

Only images you have placed within a lab’s assets directory are available using this syntax. Linking to external images via a full URL is also supported, but not recommended. URLs of external images may change over time.
TIP: Images in the assets directory do not need to be listed in the index.json file to be displayed. Only add them to the index.json file if you want them to also be copied to the envrionment for the user to access in the terminal or editor.
Show/Hide Content
The lab markup provides a simple “show/hide” capability for when you want to keep some text “hidden” from the learner until it’s time for them to access it, for example in the case where you want to pose a question without providing the solution immediately:
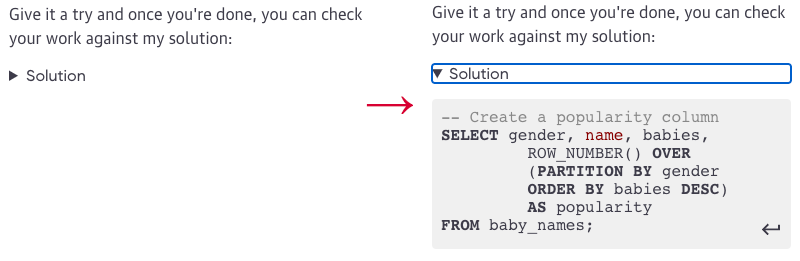
To add a show/hide block, use the following markup:
<details>
<summary>Solution</summary>

An optional explanation:

```
– Create a popularity column
SELECT gender, name, babies,
ROW_NUMBER() OVER
(PARTITION BY gender
ORDER BY babies DESC)
AS popularity
FROM baby_names;
```execute
</details>
The <summary> tag contains the text you’d like to display next to the selection arrow. Anything else inside the <details> tags will be hidden until the user clicks on the <summary> text.